Heavenly Chocolate Berry Celebration Cake
Prep Time: 3 hours
Cook Time: 45 minutes
Total Time: 3 hours 45 minutes
Servings: 10 slices
Ingredients
For the Cake Layers:
- 6 large eggs
- 1 1/4 cups granulated sugar
- 3/4 cup all-purpose flour
- 3/4 cup potato starch
- 2 teaspoons vanilla extract
- 2 teaspoons baking powder
For the Syrup:
- Juice of 1 lemon
- 1/2 cup water
- 2 tablespoons granulated sugar
For the Chocolate Mousse Filling:
- 6.3 ounces dark chocolate (around 55% cocoa)
- 3.5 tablespoons unsalted butter
- 2 large eggs, separated
- 3/4 cup heavy whipping cream
For the Dulce de Leche Mousse Topping:
- 2 cups heavy whipping cream
- 10.5 ounces cream cheese (such as Philadelphia)
- 1 can (14 ounces) dulce de leche
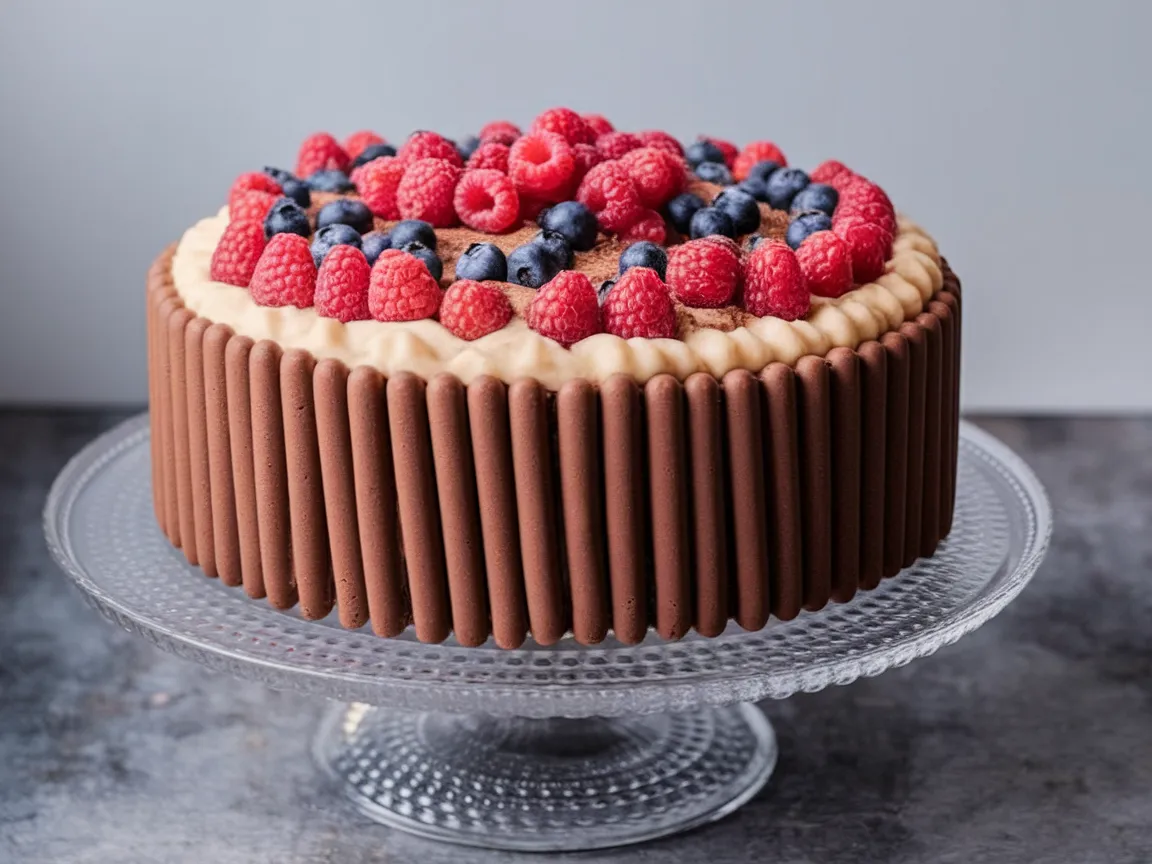
For Decoration:
- 1 1/2 cups fresh raspberries
- 1 1/2 cups fresh blueberries
- 3 packs of chocolate-covered biscuit sticks (like Chocolate Fingers, Polly or similar)
Instructions
- Prepare the Cake Layers:
- Preheat your oven to 350°F (175°C).
- Line a 9-inch (24 cm) springform pan with parchment paper, ensuring the sides are also lined to accommodate rising.
- In a large mixing bowl, beat the eggs and granulated sugar with an electric mixer until the mixture becomes thick, pale, and fluffy, about 5 minutes.
- In a separate bowl, whisk together the all-purpose flour, potato starch, and baking powder.
- Gently fold the dry ingredients into the egg mixture using a spatula, ensuring no lumps remain.
- Pour the batter into the prepared pan and bake in the lower part of the oven for 35-40 minutes, or until a toothpick inserted into the center comes out clean.
- Allow the cake to cool completely before slicing it horizontally into three even layers.
- Prepare the Syrup:
- In a bowl, combine the lemon juice, water, and granulated sugar, stirring until the sugar dissolves.
- Prepare the Chocolate Mousse Filling:
- Break the dark chocolate into small pieces and melt it together with the butter over a double boiler or gently in the microwave, stirring until smooth. Let it cool slightly.
- Separate the egg yolks and whites into different bowls.
- Whisk the egg whites until stiff peaks form.
- In another bowl, whip the heavy cream until it holds soft peaks.
- Stir the egg yolks into the cooled chocolate mixture one at a time, mixing well after each addition.
- Fold the whipped cream into the chocolate mixture until combined.
- Gently fold in the beaten egg whites until the mousse is smooth and uniform.
- Refrigerate the mousse for about 20-30 minutes before using, so it firms up slightly but is still spreadable.
- Assemble the Cake:
- Place the bottom cake layer on a serving plate and brush it with the lemon syrup to moisten.
- Spread half of the chocolate mousse evenly over the layer.
- Repeat with the second cake layer, syrup, and remaining mousse.
- Place the final cake layer on top and refrigerate the cake to set, preferably overnight, covered to prevent drying.
- Prepare the Dulce de Leche Mousse Topping:
- On the day of serving, whip the heavy cream until soft peaks form.
- Add the cream cheese and continue whipping until the mixture is smooth and slightly firmer.
- Add the dulce de leche and whip until the mousse is thick and suitable for piping or spreading.
- Decorate the Cake:
- Frost the top and sides of the assembled cake with the dulce de leche mousse.
- Press the chocolate-covered biscuit sticks vertically around the sides of the cake to create a decorative border.
- Arrange the fresh raspberries and blueberries on top of the cake as desired.

Enjoy this indulgent and visually stunning cake at your next celebration!